

IMU sensors are pretty useful because when strapped to the right location and given the right context they can provide very insightful information about an athlete’s (or anyone’s) movements. In this post, we are going to look at a couple of options in the market that allows us to skip the hardware development and jump right into the application development. Feel free to skip to the different sections that interest you:
[ Intro To IMUs – mbientlabs – Notch Sensor – Notch Mocap Test – Custom Sensors]
Intro To IMUs
In case this is the first time you are hearing about IMU, here’s a brief intro. IMU stands for Inertial Measurement Unit; it is an electronic device that typically has accelerometers, gyroscopes and magnetometers, and it measures its own acceleration, angular rate (or spin rate) and surrounding magnetic field. IMUs are not only used in sports, in fact, it is used in many consumer electronic devices. Our smartphones for one has IMUs for detecting the orientation of the phone and changing the display to portrait or landscape. The IMUs also allows for functions such as undoing texting errors, a spirit level and motion sensor games. If a user carries the phone with them in their pockets most of their waking hours, it can act as a pedometer counting steps and detect when the user is sedentary. For runners who use running apps to track their runs, IMUs enable some apps to track indoor runs and cadence. Sports Engineering Researchers have used smartphones for tracking wheelchair rugby activities and classifying different sporting activities.
As great as the smartphones are with inbuilt IMU, GPS and processing power to give us real-time analysis, we don’t really want to strap an expensive smartphone onto a football player’s calf to monitor their kicking or tape an iPhone to a tennis racket to measure swing metrics. That’s why companies like Qlipp has developed sensors for tennis or Zepp which has sensors for a number of bat-and-ball or swing type sports. Then there are sensors for rowing, running, surfing, mountain biking and more. There are also different sports equipment that has in-built IMU sensors. Like smart balls (basketball, football, cricket ball etc), smart shoes, smart helmets, smart rackets etc, it could go on and on.
But sometimes we might still not find a sensor product on the market that is right for our sports or health application. So we explore the option of developing something on our own. Fortunately, we don’t necessarily have to start from scratch* because these days there are generic IMU sensor platforms that are designed and built for people who want to develop a sensor for a custom application. They often have the standard 9-DOF (degree of freedom) sensor setup and come with software SDK that allows developers to build their own applications for processing and analysing the data. Let’s look at a couple of options below.
[*when I say scratch, I mean getting sensor boards from SparkFun, Adafruit, Seeedstudio, Tindie etc]
mbientlab
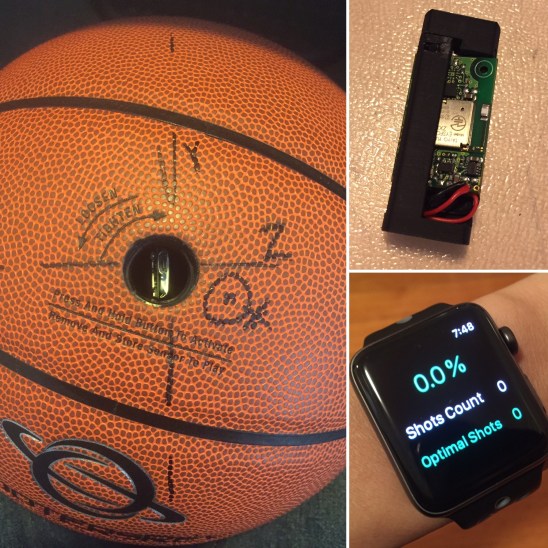
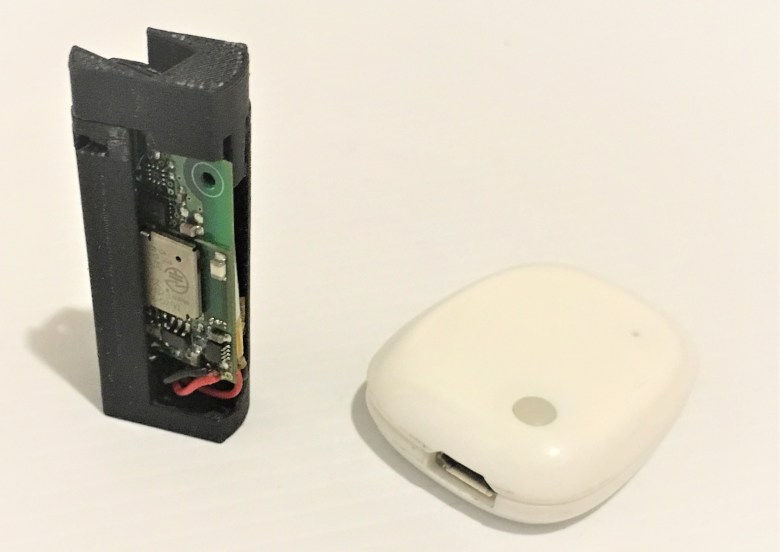
mbientlab successfully launched their first Bluetooth IMU sensor on Kickstarter. They pitched it as a development and production platform for wearables with simple API for iOS and Android. There was some simple soldering required when people bought the first product. I didn’t get one from that campaign but I did get a later updated version which they called MetawearRG. What impressed me when I first got it was the size of it – it’s small and compact and I could use it to build/redesign a smart basketball prototype for a client. Then when I started testing it, I found that their API was really easy to use and I could use their sample iOS app to build a custom app for testing within a (reasonably) short time.
Since then, they have made many other versions of sensors with:
- slightly different sensor configurations,
- options of coin cell or rechargeable lithium battery,
- accessories such as cases, clips or wristbands,
- sensor fusion firmware,
- cloud services, and
- hubs to manage multiple sensors.
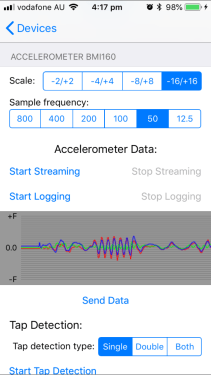
I haven’t had the chance to try everything but I have to say, I have had a good experience using their Metawear and Metamotion sensors to build various proof of concepts and I am still using them for a number of projects. The sensor data can be streamed to your smartphone or logged on the device. In terms of API support, on top of iOS and Android, they have added Python, C, C# and Javascript, so developers can build stuff on various platforms.
Looking at their new website revamp and some recent emails they sent out about new platform developments, they seem to be putting more focus into the allied health space, in particular, measuring range-of-motion (ROM). They are currently beta testing an app called the MetaClinic and it looks like they are using skeleton-tracking the likes of motion capture systems which would probably mean we need to use multiple sensors. That should be interesting.

Notch Sensors
Notch also launched on kickstarter, in fact slightly earlier than mbientlabs’ campaign. They had an interesting concept of integrating individual IMUs into custom designed clothing using pockets in discreet locations. Unfortunately, they weren’t successful at that instance. Their initial use case probably wasn’t strong enough. So I guess the founders went back to the drawing board, revamped it all and went with the “motion capture” approach for developers.
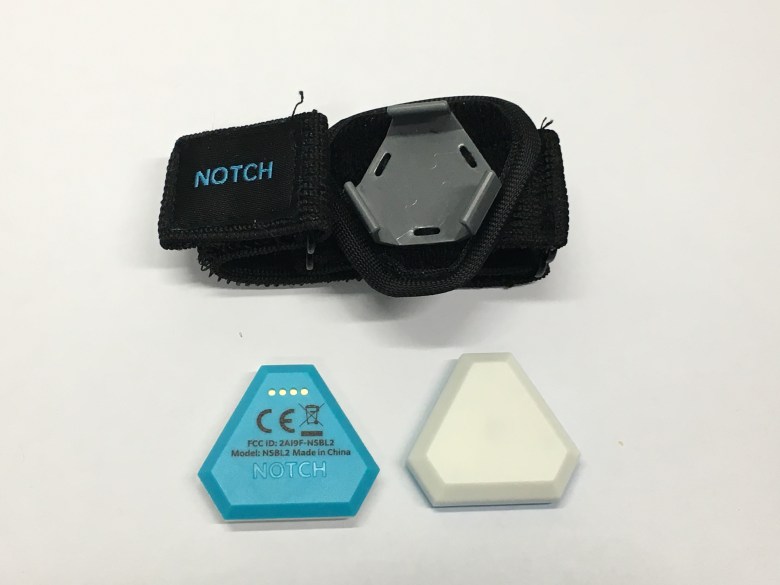
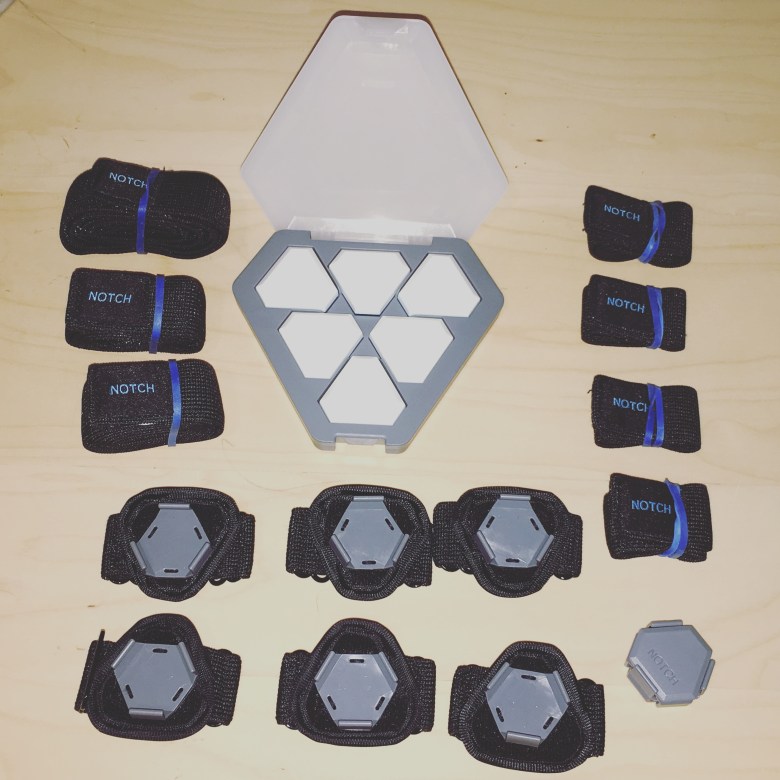
With the new design, the shape of the IMU sensor is essentially the same but they have ditched the micro-usb in each IMU for contact pins and made it water-resistant (IP67). They also designed elastic bands of varying lengths with a sensor clip and a user can secure each sensor up to 15 different locations on their body including head, chest, upper arms, wrists, hands, waist, thighs, ankles and feet. So instead of selling individual IMUs, they sell a kit of 6 IMUs with a set of elastic bands, and if a user wants to do a full (body) setup, they will need 3 kits.
A quick test and review (for biomechanics)
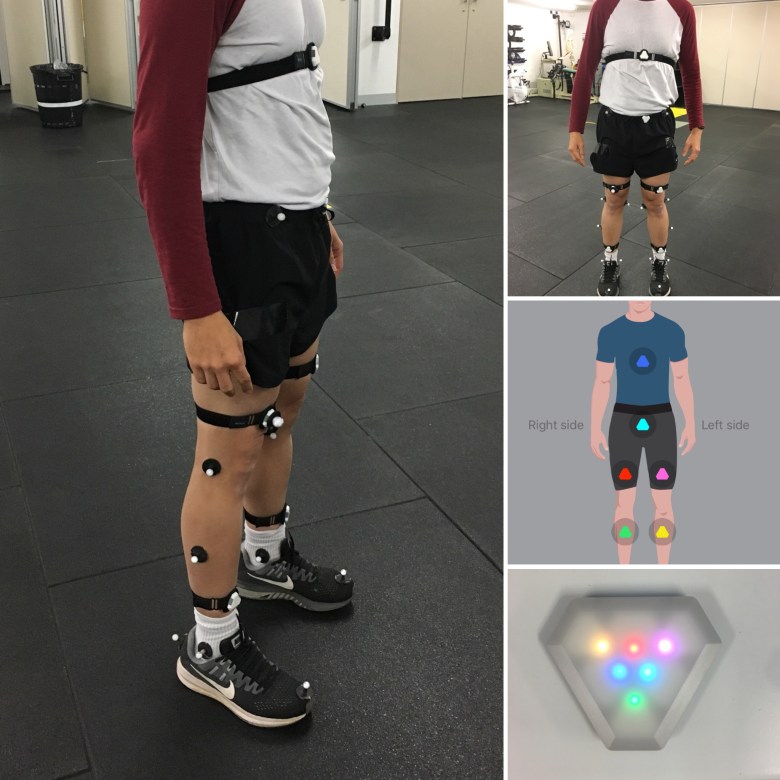
I had the opportunity to run a short pilot test with one (the pioneer) kit in a biomechanics lab. I used the lower body setup which used all 6 IMUs strapped on my chest, waist, thighs and shins/ankles. In terms of setting up, it was pretty straightforward. After following an initial calibration procedure of all the IMUs in the case, I put on the bands and clipped each IMU to the right location according to the different colours as indicated on the app. The only thing is putting on the bands takes a bit of practice and I had to swing around to check that the bands are not too tight and restricting movement. Even though I don’t have muscly quads, I felt that the bands were somewhat tight and needed adjusting after a while.
For testing, I did a simple protocol of walking, stopping and doing 3 squats of varying depths. Then I compared my knee angles measured on the notch and the motion capture system. A few quick things that I took out of the knee angle measurements were:
- The angle measured by Notch is the exterior angle while the motion capture system looks at the interior angle. It just needs a quick calculation before comparison.
- Assuming the motion capture system is the more accurate measurement, Notch had a larger error as squats went deeper.
- But for walking, the knee angles measured were pretty close.
It’s wasn’t a very elaborate test but even from this simple outcome, I can safely say it’s probably not the best tool for accurate joint angle measurements. Although for a quick 3D visual feedback on movements, it might work. Here’s the clip of me doing the test described above (feel free to rotate the video to get different perspectives):
Further to that, I could only download angle data. If I wanted the raw sensor (acceleration and gyro) data, I would need to pay for an extended license that is renewed annually.
In terms of custom development support, they used to have support for iOS but they seem to have taken that off now and only have support for Android which I thought is a bummer. I am guessing they have some issues with getting it right on iOS. Hopefully, it is just temporal and they will resolve it soon. For Android developers, it looks like they have pretty good support and even provides a template app. I have to add that there is a fair bit of fine print I need to agree to before I can get access to their SDK. If I read it right, they basically want a licensing fee for using/commercialising their SDK.
Custom Sensors
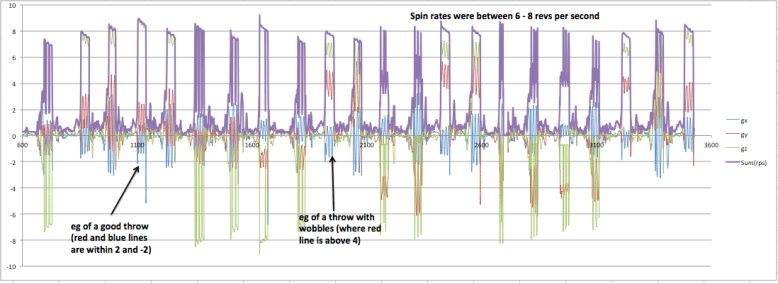
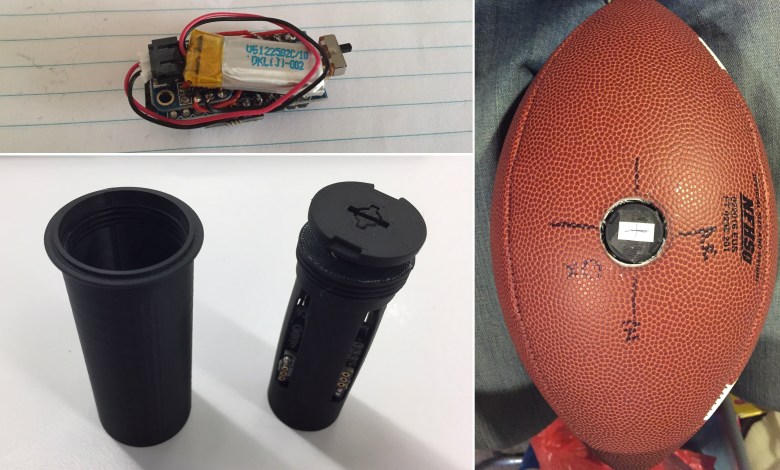
Both of the above IMU sensors have similar specifications when it comes to measuring acceleration (using accelerometers) and angular velocity (using gyroscopes). The typical measurement range for accelerometers is +/-16g (that’s 16 times of gravitational acceleration), and for gyroscopes, it’s +/- 2000 degrees per sec. For many applications, this configuration is fine. But there might be some cases where higher acceleration needs to be measured and that goes beyond 16g, like shocks or high impact collisions. Or I might need high-speed rotations to be tracked and 2000 degrees per sec is too low, like measuring the spin of a cricket ball or gridiron football (which can come close to 3600 degrees per sec or 600rpm as demonstrated here by Drew Brees).
As briefly mentioned earlier, hobby electronics stores like SparkFun, Adafruit, or Tindie would be a good place to start when looking for accelerometers and gyroscopes of different specifications. There are also lots of microcontrollers with Bluetooth Low Energy (BLE) built-in that are Arduino compatible so we can program them with the Arduino software. One that I found pretty handy is this one called Blueduino which comes with a Lipo charger add-on (and add-ons are great) and that can be found on Tindie.
Final Word
For those who are in research and possibly need Matlab and software support for building custom Matlab programs, definitely check out Sabel Sense sensors (Australia). Else, I reckon the mbientlab sensors would be a great option for starting a custom development. If I get a chance to trial their Metaclinic platform, I will put up another post. Meanwhile, do drop me a message here if you need assistance or advice in any of the options above and feel free to leave a comment if you think there are better solutions out there. With that, thanks for reading!

Thanks for posting this. I have a question about your video. How come the body doesn’t move down with the deep squat rather than the legs lifting up to the body (making it look almost like a slow motion pulling of the legs up)? Which infrared mocap system did you compare it against?
LikeLike
Hi Quin, I am not entirely sure why but this might be an animation playback issue. The mocap system I used was from Motion Analysis. Hope that helps.
LikeLike