

In an earlier post, we talked about iPhone apps that track certain sports activities with the iPhone camera. One of the apps we mentioned was the HomeCourt which tracks basketball shots on a standard basketball court (preferably indoor) and it gives the user information of how many shots were attempted, how many were made (got through the hoop) and where the shots were attempted/made on the court. For an extra monthly subscription, users can get access to their Shot Science analysis which looks at things like shot release angle (or launch angle), release time, leg angle, speed, vertical and shot type. In this post, we will attempt to have a look at how all these work and what it might mean for an athlete who wants to improve their shooting game.

Setting Up
Equipment

As of writing this, the Home Court only works on iOS and it has some minimum hardware requirements. For regular shot tracking, we need an iPhone 6s or newer, iPad Pro (2016 model or newer) , or the iPad 6th Gen or newer. Besides the iOS device, the developers of the app (Nex Team Inc.) recommend using a 1.5 metre (or 5 feet) tripod to mount the iPhone/iPad. That way, when the tripod is placed around the half-court line of the court, the iPhone mounted on top gets a clear view of the 3-point line, the hoop and the player shooting the ball. But I was also advised by someone from the Nex Team that a 1 metre tall tripod will work fine for me since I am not over 6′ 4″ (1.93m) and not likely to jump higher than the iPhone’s field of view.
Personally, I also felt that using the app with a Bluetooth earphone allowed me to hear the shot count better and possibly the real-time Shot Science feedback as well. Although I couldn’t test that (real-time Shot Science) out because I only had the iPhone 6s handy. Shot Science requires the iPhone XR or XS models to work in real-time.
Profile
Before I can start using the app, I need to set up my own profile by entering my height, position and gender (the last 2 are optional). Then I also have to select the Court Type; the options include “US High School”, “US College”, “FIBA” and “NBA”. Picking the right Court Type, I believe, will help me better understand where I attempted my shots and to some extent improve the calibration process which is the next step.
Calibration

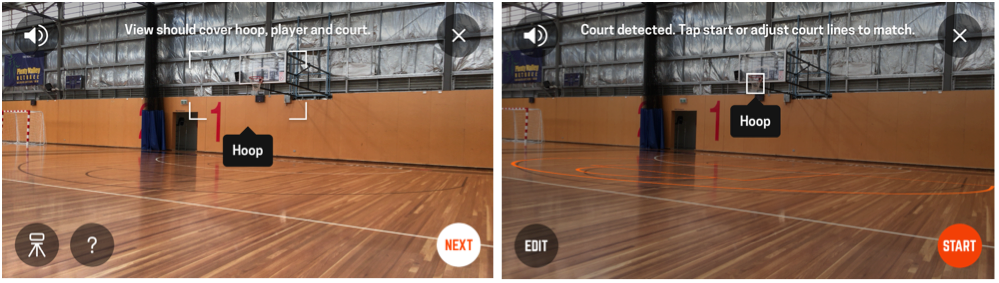
Once I have completed my profile and selected Court Type, I can go ahead and mount the iPhone on the tripod with the back camera facing the basketball backboard and hoop. Going to the “Record” tab on the App and picking the “Shooting Workout”, I then got prompted to adjust the iPhone camera position and orientation till the Hoop is within the augmented square. Hitting the NEXT button allows me to make fine adjustments to match the augmented Court to the actual Court. Following that, hitting START means I can start a workout session tracking my shots.
The entire set up process took less than five minutes.
Standard Shot Tracking

Standard shot tracking is pretty straightforward. Each time I attempted a shot, the app recognises it and adds one to the “Attempts” counter. Likewise when I got the ball into the hoop, the app recognises it and adds one to the “Makes” counter. The app announces every “Attempt” count but it was difficult to hear it from over 5 metres away. So having the Bluetooth earphones was helpful. Although it might be better if it also reports the “Makes”. Once I am finished with my session or if I want a break, I can just stop the App (recording) and see my results. The results I get from each tracked session consists of 2 main things:
The number of shots attempted and number of shots made
- Where the shots were attempted/made (red dots for makes and crosses are attempts).
From there, the app derives other statistics such as: overall accuracy, distribution of range of shots (In-the-paint, mid-range or 3-point), and streaks (times when there were continuous shots made).
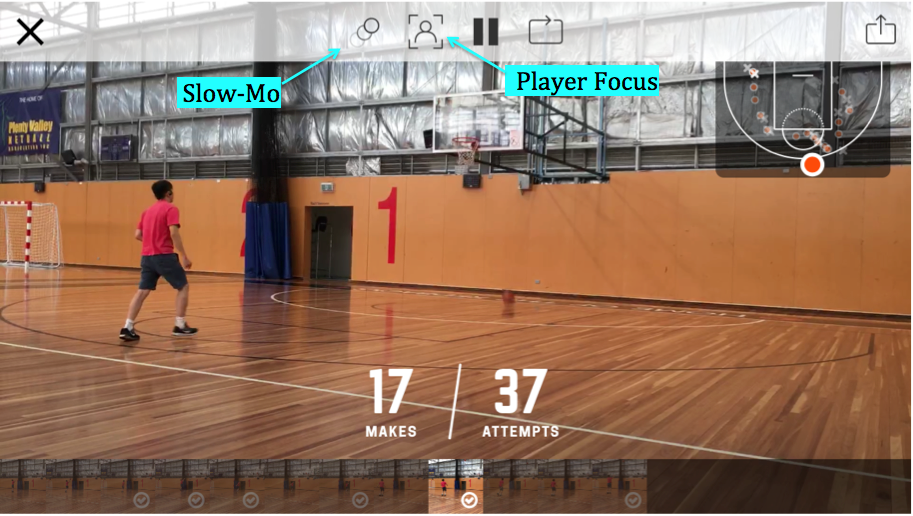
Another nice feature is I can replay all my shots and have a visual of how I performed for each shot. I could also do a slow-mo replay or a zoomed in of myself doing each shot if I want to analyse my technique.
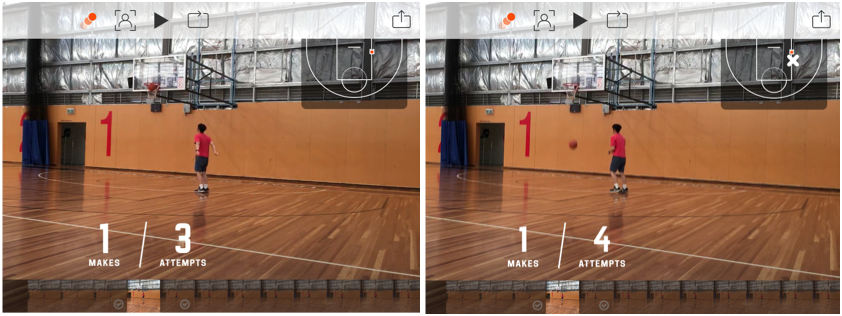
In terms of accuracy, there were a handful of errors. There were instances of “false positives” or Makes identified that weren’t actually Makes (see video above). There were also “false negatives” or Makes that were identified only as Attempts. But those were few and far between. On top of that, once when I did a session outdoors, the App also counted Attempts when I was dribbling the ball or the ball was just bouncing on the court. I think in the case of the outdoor court, I suspect cars driving past in the background might have messed up the tracking algorithm. I imagine that is the reason indoor courts are recommended.
Shot Science
Now let’s have a look at what Shot Science does. As mentioned earlier, Shot Science only works in real-time and gives real time-feedback when a user has the iPhone XR, XS or XS Max. However, for iPhone 6s and newer, Shot Science is still available post workout, and that’s what I did for this review.
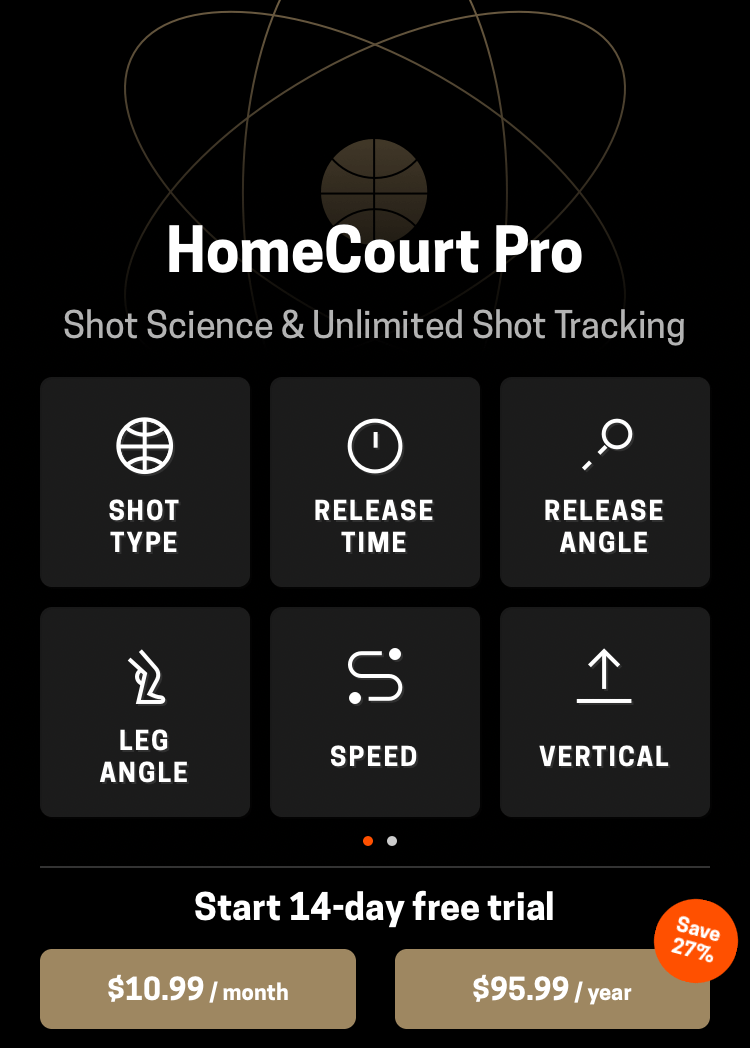
In order to get access to Shot Science (plus unlimited shot tracking), I need to sign up for HomeCourt Pro. It costs $10.99 per month and if I sign up for an annual subscription, it will cost $35.89 less. For those who are unsure, there’s also a 14-day free trial so you can test it out and decide if an on-going subscription is for you or not.
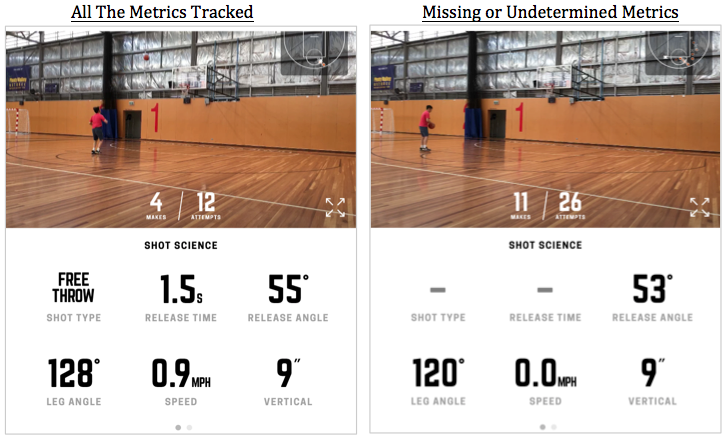
Shot Science analyses 6 different things in each shot and here’s what they mean:
- Shot Type – It tracks 4 shot types including Free Throws, Lay Ups, Catch & Shoot and Off The Dribbles. (And if the app can’t determine the Shot Type, it’s listed as Unclassified)
- Release Time – That is the time measured from the user catching the ball or picking up the ball after dribbling, to releasing the ball. (A faster release time means there is a better chance a user can get a shot off before a defender closes out.)
- Release Angle – That is the angle of a user’s follow through as the ball is heading towards the basket. (A higher angle means the user was putting more arc into the shot.)
- Leg Angle – The angle of the leg bend when shooting. (A lower angle means the user was bending lower and using more legs, while a higher angle means the user was standing more straight up.)
- Speed – The speed of the user moving into their shot; that includes the speed of their lay up, and speed of their movement into their off the dribble.
- Vertical – That is the height of the user’s jump on their shot.
Ideally, I would like to have all the above statistics for every single shot I attempted. But in reality, the app is unable to determine certain metrics sometimes and often what I see is undetermined Shot Type, unknown Release Time and undetermined Speed (or 0.0 mph).
Ground Mode
What we have discussed so far is a setup using a tripod with an iPhone mount. If you don’t have a tripod handy, the App also has a ground setup option called Ground Mode. All you need to do is lean the iPhone on an object (like a water bottle) on the ground and use the front facing camera positioned to face the basketball hoop. This is a really convenient setup.

Although I did find it awkward trying to adjust the iPhone/camera position while it is placed on the ground. Being outdoors (in my case when I was doing this testing) made it worse because of the reflection on the screen. Once the iPhone is in place, I just needed to shoot a free throw to calibrate the court, and I am good to continue with the shooting session.

A downside of Ground Mode is that Shot Science is not available in that mode. Also, I noticed that were more errors in the Ground Mode session in terms of Attempts/Makes tracking compared to a session using the Tripod setup indoors. It (the lower accuracy) could be because of the lower resolution of the front facing camera, it could be the lack of a net, it could be the ‘noise’ from being outdoor or a combination of all that.
Other Features
Progress over time: One key feature of this App is that I can keep track of all my sessions and see how I have progressed over time. That includes overall statistics of my number of Makes vs Attempts as well as where on the court I have more Makes. It is also basically a log of how often I do a session and how much time I spent on each workout. A secondary feature of this is, the App sends notifications/reminders when I have not tracked a session after a while.
Social aspect: Similar to Strava or Runkeeper, I can find and add friends who also use the App. Then when they have done a session, it will show up on my Feed and I can see how they are tracking. I can also give them the thumbs up. For those who have a competitive streak, seeing how well their peers are doing might motivate them to go out and workout some more.
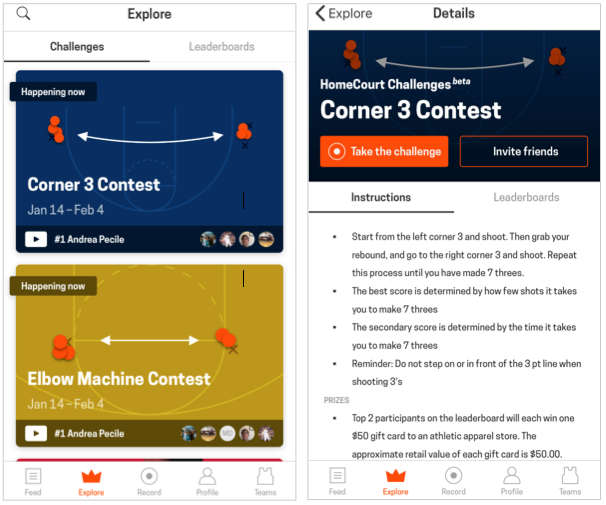
Challenges: If someone gets bored of just trying to make shots, they can check out the Explore tab which has some interesting challenges. Each challenge has specific instructions of what they must do (if they take up the challenge) such as standing on specific locations on a court, making a number of shots and possibly in the shortest time. Of course the session must be recorded using the App through the Challenge. Then a winner will be selected at the end of the challenge period and awarded a prize.
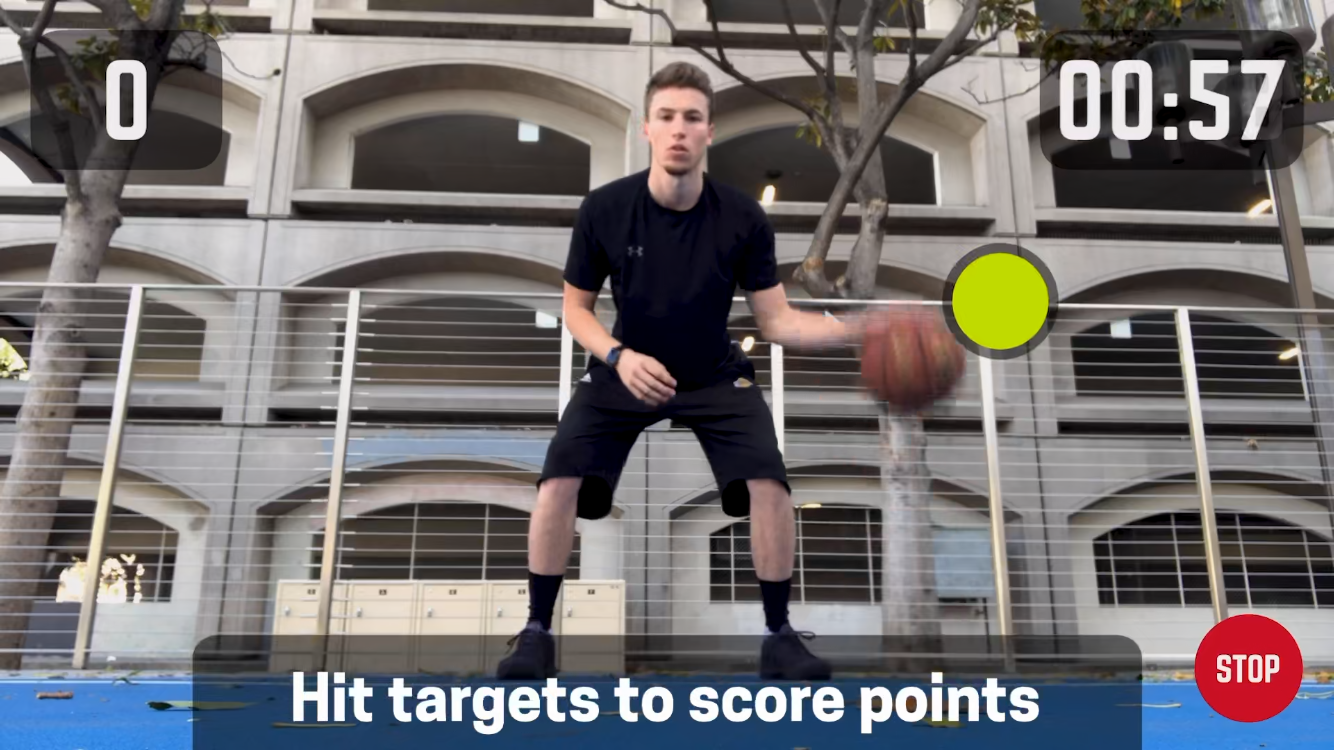
Dribble Workout (new): A new feature that was added late 2018, the Dribble Workout aims to improve a user’s ball-handling skills using augmented reality and gamification. The setup is similar to the Ground Mode setup using the front-facing camera of the iPhone. In fact, it is quite similar to another App called Dribble Up that was released back in 2016. The only difference is the HomeCourt App works with any basketball while the Dribble Up App requires a Dribble Up branded basketball to work.
Our Verdict
HomeCourt is a user-friendly and practical app for any basketballer who wants a means of tracking their training and shooting performance. It is not the first consumer basketball tech in the market that tracks shooting. There have been smart basketballs like the WilsonX, wearable sensor sleeves, and a combo of wrist and hoop sensors by ShotTracker. But this is the first App that tracks shots with an iPhone camera and computer vision algorithms.
Accuracy-wise, we have seen that the App (running on an iPhone 6s) is not 100%. Lighting, minimal background movement, clearly drawn court lines can all contribute to shot tracking accuracy. So the Tripod setup in an indoor court with clear (basketball) court lines and good lighting is probably ideal (for the App’s performance) and give the best accuracy. But practically, I might just go to the nearest outdoor court at the park and shoot some hoops (like I did for the Ground Mode example). So being able to track with minimal equipment and fairly accurately would be ideal (for me).
For those who want to have Shot Science analysis, a Tripod is a must. It is an extra piece of equipment compared to Ground Mode but it is worth it. There is definitely value in measuring some of those metrics, and being able to play back your shots and get visual feedback adds context to those numbers. As mentioned earlier, if you are using an iPhone XS or XR, you can get real-time Shot Science feedback; and I reckon using Bluetooth headphones will be beneficial as it allows you to properly hear the real-time metrics being called out.
What would be cool to see next time
I think a useful feature to have in the App would be allowing the user to correct the identified shots. If there wasn’t an Attempt or a Make, it could be removed. Or if there was a Make that was only identified as an Attempt, it could be edited to reflect accurately. It might only be a small per cent of error but being able to make it right and know that my previous statistics are 100% can give a more accurate picture of my progress. Maybe that’s just me. Also, being able to track left or right-hand shooting would be a cool thing to have especially for people who want to train their non-dominant hand.
Would I keep using this App? The short answer is yes because it makes shooting hoops by myself much more fun. But whether the HomeCourt Pro subscription is necessary, that’s another question. Do note that with just the basic App, each user can only track 300 shots per month for free. To put things in perspective, while testing this App, I could do over 150 shots in half an hour. So anyone who wants to track more than an hour of shooting per month should seriously consider subscribing to the HomeCourt Pro.
And that’s all for this review. Feel free to leave a comment if you would like to share your own experience of using the App or if you have any questions. With that, thanks for reading!

You have given large information. I am searching for a long time you are just too good I can’t tell you with the word. Thank you for giving us this kind of information.
LikeLike